
What brings an angler to try his hand at custom fishing rod building? For me, catching fish on a rod I built myself is akin to the satisfaction I’ve found from catching fish on a lure I built myself. Some anglers learn the rod-building basics so they can take old, forgotten rods, and give them new life. Other anglers get into it to create rods customized to their fishing styles and tastes. No matter the draw, rod building can grow into a very satisfying hobby.
Rod Restoration
A good place for any aspiring builder to start is by repairing or rebuilding an old rod.
Almost every angler has an old rod in his collection that has seen many battles over the years but currently sits idle, perhaps with a damaged guide, a broken reel seat, or outdated components. Bringing that old warrior back to being combat-ready can be very satisfying.
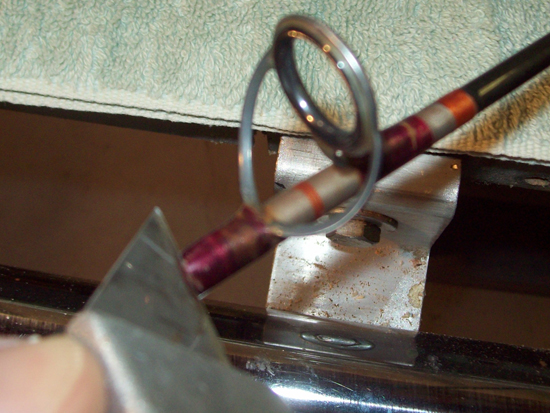
A rod with cracked, corroded or grooved guides is a great project for an aspiring rodbuilder. You can replace the broken guides, or switch out the entire set for newer, lighter guides. The first step is removing the old guides. Rods have an epoxy finish applied over the thread that holds the guides to the blank. Gently warm the epoxy with either a heat gun or hair dryer to soften it up. Once the epoxy is warmed, use a utility knife or a razor to slice through the thread over the top of the guide foot. Do not cut along the rod blank, as any errant cuts could damage the blank’s integrity. Peel off the thread to remove the guide and then unwind the rest of the thread from the rod. Gently scrape or sand off any remaining epoxy, being careful not to score the rod blank in the process.
Save the old rod guides and either take them to your local shop to pick up replacements or look through the online catalog of a rod-building website to find a matching style of guide. Guide sizes are measured by the outside diameter of the guide ring, so a size 20 guide has a ring diameter of 20 mm. Purchase the guides, nylon rod-building thread in your preferred colors, some color preserver and epoxy finish. The color preserver will keep the thread from becoming translucent when you apply the epoxy finish.

I like to prep the guide feet before mounting them on the rod. This step involves tapering them down a gentle slope to form an edge at the ends. For this step, use a file, a grinding wheel or a sanding disc mounted on a drill. The taper creates a ramp for the thread to climb up when you wind it on and also adds a bit of flexibility to the guide foot where the end of it meets the blank. This flexibility aids in preventing the finish from cracking at the end of the guide foot when the rod flexes. (Cracks in the finish allow for water to penetrate, weakening the thread and promoting corrosion of the guide.) As a final preparation step, paint the guide feet with quality enamel paint, which adds an extra layer of protection against corrosion.
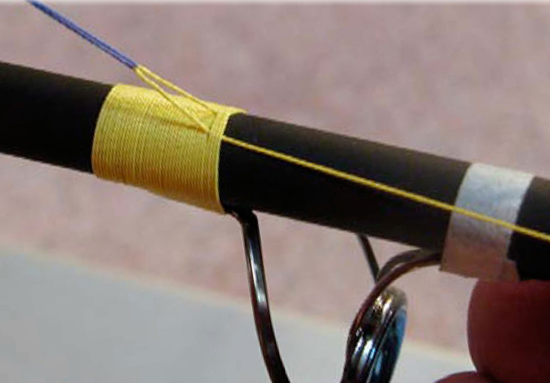
Next, fasten the guide to the rod by winding thread over it. You’ll need something to hold the rod while turning it, but there’s no need to run out and buy an expensive rod lathe. You can use something as simple as a cardboard box with “V” notches cut into the ends or spend a little time in the workshop to create a functional jig. The V notches should be lined with felt to prevent the wood from scratching the blank. I like to add some tie-downs so that I can tie the blank into the jig to keep it from jumping out of the grooves and to provide some friction to prevent the rod from slipping backwards while turning it by hand.
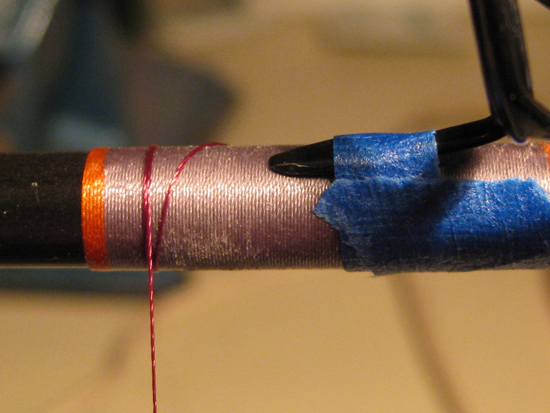
Start by positioning the guide on the rod blank, aligning it as closely as you can with the reel seat. Tape it in place or use small rubber bands to hold it in position. The thread should be wound onto the rod in the fashion of a whipping, with the tag end pulled underneath the subsequent wraps of thread. You can start this by using a small piece of tape to hold the thread to the blank while you wrap over it. Use moderate tension on the thread while winding the guide on. Tension can be provided by running the thread through the pages of a book and stacking some books on top to add weight. The whipping is completed by using a tie-off loop to pull the tag end back underneath the wrapped threads.
After the guides are wrapped onto the blank, you will be able to reposition the guides to get them aligned. This may take a little pushing and shoving, depending on how much tension you achieved when binding them down.
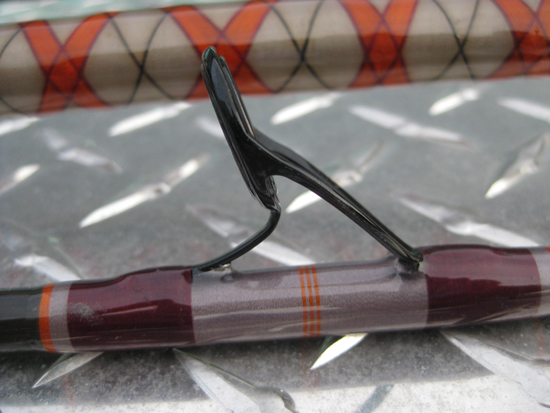
Brush on a few coats of color preserver, flooding the surface of the thread, then allow it to soak in. Wipe away any excess with a paper towel and allow it to dry. After two coats of color preserver have completely dried, mix up some thread finish as per the instructions on the bottle. Make sure that your mixing container, stirrers and working area are free of contaminants (oils and silicone are the worst offenders) and apply the finish to the thread with a brush. Small acid brushes are good for applying the finish as they are cheap and disposable. Apply a liberal coating, but make sure to brush away any drips that form on the underside of the rod. Spin the rod 180 degrees every 15 to 20 minutes during the first 1½ to 2 hours, until the finish begins to take a set, removing any excess finish that starts to form drips. The finish will self-level during these rotations. Allow the finish to cure for 48 hours before using the rod.
Beyond replacing a broken guide or two, an older rod can also be completely stripped and rebuilt. Removing old grips is pretty straightforward, and reel seats can be spiral cut with a Dremel tool and removed—just be careful not to cut into the blank! Blanks can be sanded down, painted and finished so that when all of the new components are mounted, the entire rod looks brand new. Sand the blank carefully, using a 200 grit or finer paper, being careful to sand only the outer finish and not the fiberglass or graphite material underneath. For paint, a friend in the auto body business can spray the blank with flexible bumper paint or you can get good results using Krylon spray paint. Apply a flexible clear coat over the paint either by spraying it on or using a foam brush to apply polyurethane spar varnish.
Building a Custom Rod
I like to think of a “custom” rod as one built for a particular angler to match up with a particular reel to fill a particular niche. Some consider any rod built by hand to be custom built, but the truth is that most of the rods on the racks of your local tackle shop were built by hand. It’s fitting the rod to one angler that truly defines a custom one.

The first step in custom fishing rod building is in determining which rod blank to build on. There are many items to consider just in choosing the blank alone, such as the manufacturer, the material (fiberglass, graphite or a composite), length, action and rating. Trying to decipher the various ratings and descriptions on the blanks is somewhat of a skill in itself.
The best bet is to either find a local retailer with a selection of blanks that you can pick up and feel for yourself or to consult with another builder with experience using a broad selection of blanks. There are online retailers that cater to builders calling in and asking for information about blanks, and their businesses depend on offering good advice. There are numerous online discussion boards that cover rod building ranging from local to national posts. Snoop around on these posts and figure out which of the builders sound reputable and learn what you can from what they post—just remember that anyone can post information regardless of skill level.
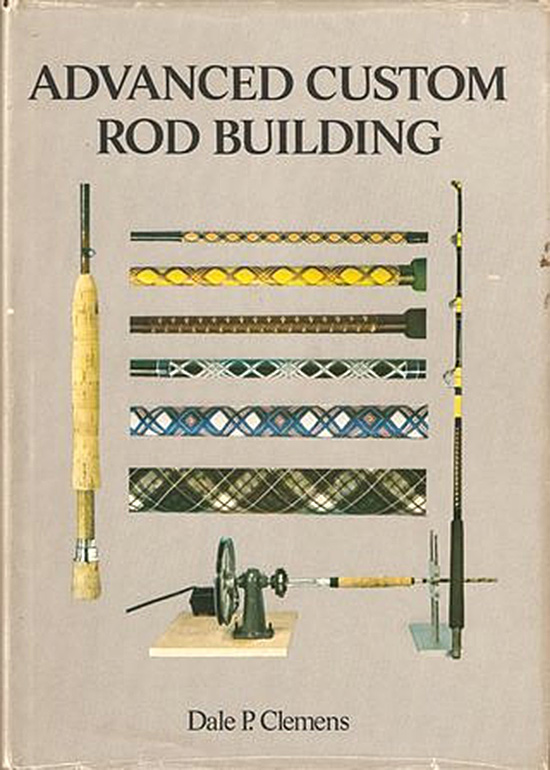
Recommended Resource
To guide you through your first foray into rod building, pick up a comprehensive book on rod building. One of the best is an old standby, The New Advanced Custom Rod Building by Dale Clemens. The book is a valuable resource for any rod builder.
Once you have decided on a blank to build on, you need to determine what components to use for the build. There are decisions to be made about the handle, reel seat, guides, tip and thread colors.
Handle components run the gamut of composition and configurations, from aluminum unibutts to lightweight cork rings and everything in between, each with their own set of pros and cons. Cork looks good, feels good and is very lightweight, but is also expensive and takes a beating in a rod holder. EVA grips are light like cork, easy to work with and come in a variety of colors, but they also don’t hold up to the rigors of being yanked out of a rod holder when there’s a good fish on. Hypalon is durable but heavy with a softer feel. “Slick butts” made of hard plastic hold up very well in rod holders but are slippery, as their name implies. You’ll need to decide how you will be using the rod and select the material that best suits your individual needs.

Make A Hand-Powered “Lathe”
When wrapping guides onto a rod blank, you’ll need something to hold the rod while turning it. Before you purchase a rod lathe, try using scrap wood to create a functional jig. Line the V notches with felt to prevent the wood from scratching the blank, and add some tie-downs to prevent the rod from slipping while turning it by hand.
Reel seats are a somewhat easier decision to ruminate on. Reel seats are generally made out of aluminum or graphite-filled nylon. Basically, you only need to consider a few things when choosing the right seat for your build. Primary considerations are strength requirements, the diameter of the blank where the reel seat will be mounted and whether your reel will fit properly under the hoods so that it can be locked down. You may want a seat with heavy hoods for your offshore build or one with an exposed portion of blank to add sensitivity to your fluking rod. The old wind-on plate style reel seats are still available for surf rods with cork tape handles. Several manufacturers offer reel seats that come in various colors and patterns as a way to add “bling” to your custom build.
Guide selection is very important to the outcome of your custom rod. The selection here is quite broad and includes many details. There are numerous guide manufacturers that offer a wide array of guides to choose from. Will the rod be used for trolling or casting? What type of line will be used with this rod? In addition to choosing a guide style, you’ll need to determine the layout of the guides on the rod. This will determine the number and size of the guides needed for your build.
Each manufacturer offers a slightly different twist on guide construction, materials and color options. The most important consideration is choosing a frame style that will optimize the rod for your fishing technique. Also consider the overall weight of the guides—fewer, larger guides tend to be heavier than many smaller guides. Frame and ring colors don’t have any effect on the function of the rod, but they do play a role in the satisfaction garnered when others are admiring your work.
The final decisions involve the thread colors to be used for the build and any patterns you might like to incorporate into the rod design. Your wraps can be as simple or ornate as you’d like. Trim bands, inlays and weaves will all add to your rod’s aesthetic appeal.
Building the perfect fishing tool to match your technique and style of fishing is extremely satisfying, and not difficult to get started. Just be warned, rod building can be very addictive, much like fishing!
About the author:
James Levy has been building fishing rods as a hobby for nearly 40 years. He is a member of the Custom Rod Builders Guild and has presented techniques at several Guild seminars.
I have learn some good stuff here. Certainly worth bookmarking for revisiting. I surprise how much effort you put to make such a great informative website.
https://www.plurk.com/p/mvxuti