
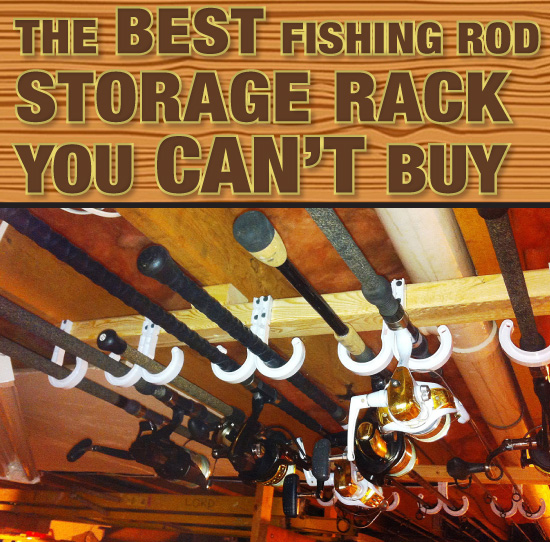
Surf rods. Boat roads. Wire-line rods. Fly rods. Baitcasting rods. Spinning rods. Ultralight rods. If you’re like me, you own at least one rod for every possible fishing situation you could ever come across. For years, I stashed them in various locations in my house and garage. While this system did, for a while anyway, prevent my wife from seeing them all in one place and figuring out how many rods I really own, she isn’t fooled anymore. “Another rod?” is how she greets me when she beats me home from work to find one of those long, skinny shipping tubes sitting by the garage door. Once I realized that there was no hope in trying to keep my wife in the dark, I decided to come up with an inexpensive way to organize and safely store my rods in one location, near my workshop, so they would be easy to access if I want to perform some maintenance or do some quick rigging before a trip—or if I just want to sit back and admire my massive collection of fish-catching weapons. The Do-it-yourself fishing rod rack was born.
Store-Bought Racks
There are many types of ready-made fishing rod storage racks. Some store rods vertically, or on rolling racks, which only works if your rods are shorter than your ceiling height. Since I am an avid saltwater fisherman, a surfcaster, and I have a few fly rods too, that doesn’t work for me. There are other racks that store rods horizontally on walls or ceilings, which is much more to my liking. The issue with most of those horizontal racks is that they only store 6 to 10 rods, so you have to buy multiples to store the rod collection of an avid fisherman. Then, there’s the cost. Commercial rod storage solutions can be expensive, depending on what they are made from and how pretty they are. I’m not sure about you, but I don’t think many of us are storing our rods in a place where they need to be displayed on stands made of stained oak, mahogany, teak, or stainless steel. We just need something that does the job effectively.
Not Cheap, “Frugal”
In my classic New Englander “frugalness” (I like to think of it more like “practicality” than outright cheapness), I came up with my own storage rack that can be made with simple hand tools and a trip to the local home center. In about 1 hour of your time, you’ll create rod storage for the ceiling in your basement, shed or garage that can store at least two-dozen rods of nearly any length. If you want to store more, you can adjust the size or build two sets; make sure you have enough room to store every rod you own with a little extra space for the new rods that you are sure to acquire!
Location, Location, Location?
The basic design can be adapted to any location or situation in 8-inch increments. I have my racks mounted in my basement ceiling, but you can put them anywhere you have space, and you can use drywall anchors if you can’t locate a solid floor joist or rafter. If you want to mount them in an outside location, such as under a deck, you can use pressure-treated studs and stainless steel siding nails or screws. When you are done, you can stain them if you want, but these are really more for practical storage than for showcasing your collection.
 • Tape Measure • Combination Square or Ruler • Pencil • Hammer • Cordless drill (3/32” and 1/4” bits)
• Scissors • Fine Sandpaper • Fine-toothed handsaw or power saw
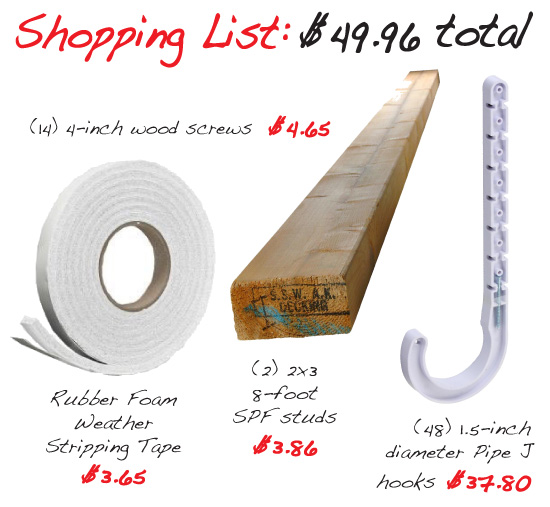 (2) 2”x3” x 8’ SPF studs.
Make sure they are straight, not bent or twisted.
(48) 1½” diameter PVC pipe J-hook pipe hangers.
Sold in bulk packs of 10 at most home centers.
(14) 4” wood screws
(Optional) 6 feet of ¾” foam weather stripping or sticky-backed Velcro to mount on the inside of the hooks. White color is preferable to match the J hooks, but black will work too. If using Velcro, you will only need the loop-side (soft) since you are using it to cushion the rods.
 Using a tape measure, make a mark every 8 inches down the entire 2×3 wood stud on the 3-inch side (2½”actual dimension). Use a square, or just a ruler, to draw a line on the studs at those locations. You can use a 2×4 stud if you like, but the 2×3 is lighter and easier to mount to the ceiling.
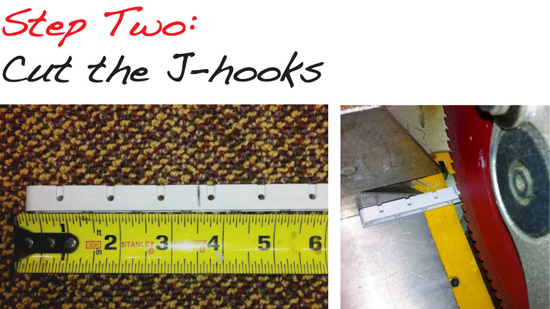 Remove the included nails from the J-hooks and put them aside. Make a mark 3½ inches from the top of all 48 J-hooks. (If you use a 2×4 stud, cut the J-hooks 2½ inches from the top.) Cut the top 3½ inches off all 48 J-hooks with a hacksaw or fine-toothed handsaw. If you use a power saw, make sure the blade is rated for cutting plastic. Using a blade not rated for plastic could cause dangerous kick back!
 Starting at the left end of the stud, locate one J-hook, facing it inward with the cut end of the hook flush with the top surface of the stud and the left side of the hook flush with the left end of the stud. With the J-hook located, drill pilot holes with a 3/32-inch drill bit through the mounting holes into the stud. These pilot holes will keep the stud from splitting. Nail in the hook using the nails that came with J-hooks.
 Proceed along the stud, lining up the edge of each J-hook with the lines drawn every 8 inches, and nail the hooks to the stud back to back. There’s no need to drill pilot holes for these middle hooks, as the wood will not split in the middle of the stud. When you get to the right end hook, drill two pilot holes like you did for the left end and install the right end J-hook. You have finished one of the fishing rod storage racks!
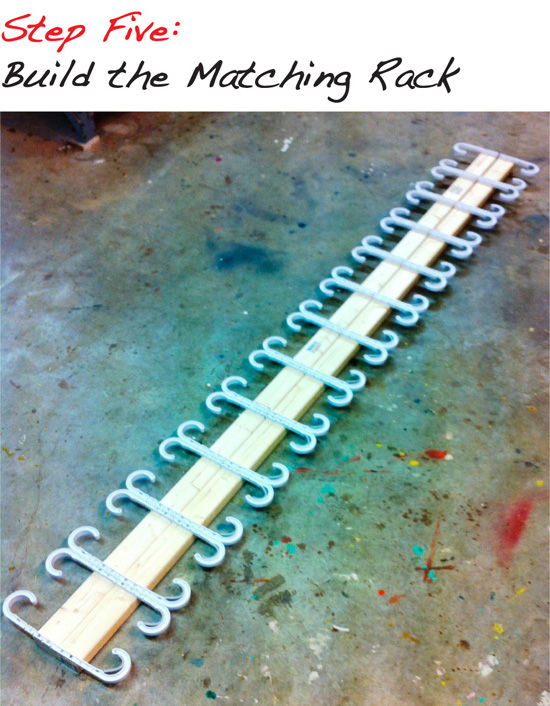 Now, repeat the first four steps to create the matching rack. When complete, you’ll have a matching set that looks like this.
 Cut the ¾-inch Velcro (loop side only) or ¾-inch weather stripping into 24 3-inch strips. Lightly sand each hook with fine sandpaper in the area where the strip will be applied to help the strips stick. Install strips into the inside of all the J-hooks on one of the rod racks to protect the blanks. The other rack will hold the rod handle, so cushioning isn’t necessary.
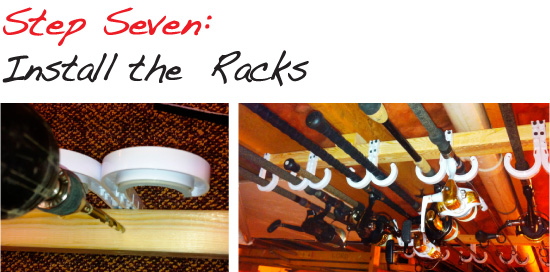 Mount the rod rack to your ceiling by drilling ¼-inch diameter holes through the rod racks in line with the joists and using at least 4-inch wood screws to secure each rack to the joists. Drill the mounting holes between the hook mounting nails so you do not hit the nails. If you have pipes, wires or other objects hanging below the joists, you might need to use some wood blocks to step the racks down away from the obstruction. Just make sure you have at least 1½ inches of engagement into the wood with each screw. Use longer screws if you have to go through ½-inch drywall or plaster to get to the wood joist.
I placed my rod holders about 44 inches apart. That’s close enough to support my ultralight spinning rods and fly rods without bending the rod blanks, but it’s far enough to support my 11-foot surf rods properly. You can experiment with distances to find the right distance for your rod assortment. You don’t want the rod stored in a position where force on the unsupported blank causes it to flex.
This article was originally published online in April 2018.
Great racks. I used this as a guide and built one this weekend.
Thanks for posting.
Thanks great idea I incressed size o j hook to 2 inches handles my big saltwater trolling stuff hung 60 today
Great idea, I’ll make one today if I can find the J hooks.
Great rack. I’ll be making 2 sets; one for my 8 year old grandson Caleb Holmes for his first rod/reel (upcoming Christmas present) with room to hold more, and one for my half dozen freshwater (NW Ohio) rod/reel sets.
Genius! I added a second row buy hanging them lower.
I use these pipe hangers on my pontoon, I put them up and down, or inline vertically on one side inside on aluminum playpen frame and hang rods there, I only have three on board at one time, then when done fishing for the day, which is the saddest part of the day, I hang my wet towels over the edge to hind them from view. Works EXCELLENT !!! No pictures yet, sorry, its in storage due to the 12″ of snow here now.
Used a couple of 1 X 3’s of mahogany and a pocket hole jig, created an inverted “L” hooks hanging down. Great idea to expand off on. Varnished and installed on finished ceiling, Look great. Thanks for the idea.
Nice! Mine turned out well, even though all I could find was 2″ j-hooks. Great post!
Love it, keep it simple and easy. Thanks!
I have something similar, my hooks screw into the wood. Drilled pilot holes first.
It’s easier to store your rods and reels of you do reel one end then rod tip the next hook..good luck!
Nice idea. Thanks for posting, I’ll make like this.
I was laughing through the whole story! This guy is talking about me. Great post, thanks for sharing.
Thought I was one of the few who fishes fly, spin, and surf.
Having them rigged and ready cuts down my ‘go now’ time
This is a great idea for rod reel storage, Plus i’m in luck, i have a basement ! Thanks for posting your idea.
Excellent idea, cheap, expandable, and moveable! Used flat head screws in place of the nails that come with the hangers. Thanks!