
Would you like to see your photographs gracing the pages of On The Water magazine? We’re always looking for photographs that capture the essence of fishing in the Northeast. Follow these tips on how to take your photographs to the next level. Then, submit your best shots to photos@onthewater.com. These tips are also especially applicable to participants in the Striper Cup Catch & Release competition.
1) A good camera is half the battle. Digital is the only way to go, and prices on high-resolution cameras have plummeted while technology has improved. An SLR is ideal, but many point-and-shoot models can take phenomenal photos. Be sure that the camera is set to take photos at high resolution.
2) Always pay attention to the lighting. The sun should almost always be at the photographer’s back, and beware of any shadows on the subject. It’s important to hold the fish at an angle that shows it to the camera and keeps it well lit by the sun.

3) Watch your focus! Most cameras will auto-focus on a specific spot within the frame. Make sure that the auto-focus is focusing on the fish, not on the angler or on something in the background.
4) Keep it simple. Start with the automatic mode on your camera. You don’t need to mess with the fancy settings to get a good shot! For more control, try the nearly-automatic “program” mode, which allows you to control the flash. Learn a few of the camera’s presets for specific scenarios like action, macro, and low light photography if you want to experiment.
5) Keep the big picture in mind. What is going on in the background? Are there empty coffee cups and a cluttered console? Water makes a great background, but having the rod and reel, a lure, or a shoreline in the photo helps tell the story of how the fish was caught.
6) Learn how to use the fill flash on your camera. The flash is not just for low-light scenarios. On bright days, you can use it to fill in shadows. You should also always use it if there are shadows on the subject that cannot be avoided.
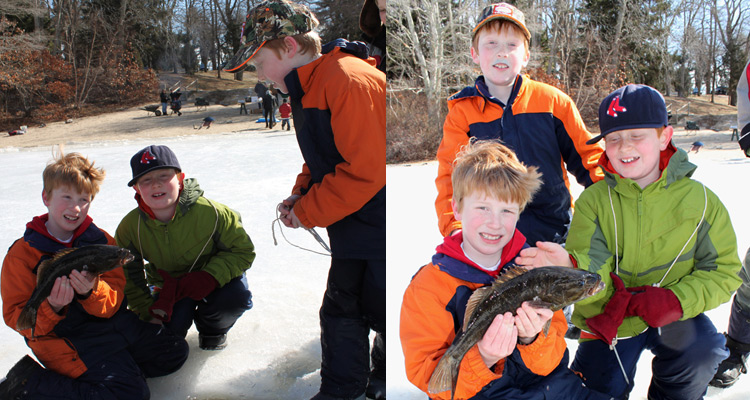
7) Don’t be afraid to be a director! Tell the subject how to move and position the fish to get the best shot. Have the subject “model” the fish and work it, but try not to make it look too posed. It should seem as if the person isn’t aware that they’re being photographed.
8) Always try to shoot a photo from different angles. Get down low, get up high. Photos taken at an angle always look more dramatic than those taken straight on. Get in the habit of shooting vertically, not just horizontally. If you want your photo to be on the cover of OTW, it has to be vertical!

9) Review Your Shots. After taking the first few photos, review them on your camera to make sure they’re coming out OK. Perhaps you need the fill flash, or perhaps you left the camera on the wrong setting the last time you used it. Correct any fundamental issues, then fire away. Don’t wait until the fish is onboard to start shooting – capture the action of the fight, the landing and the celebration to tell the complete story.
10) The person holding the fish should almost always look at the fish, not the camera. It should seem as if the person is acting naturally and isn’t aware that they’re being photographed. They should look happy, not mean. Fishing is supposed to be fun!
Great tips. What do you think of the iphone camera ?
for the most part your comments and instructions are correct. However, technically speaking, the old adage of keeping the sun over the photographers shoulder is not totally correct. In your picture the two fisherman are covering their faces with hats by looking down. If they were not then they would be squinting. Also the photo is slightly over exposed. The sun will reduce the contrast and dynamic range of the colors. That is why photographers will shoot with side lighting, pick an angle where the subject is not blown out by the bright rays, shoot at a different time of day or shoot with the light to the subjects back (or keeping the subject in some amount of shadow) and using a flash as a fill. Many times on a boat or when I am shooting a wedding (0n land) I will put the subject into the shade and flash fill. But keep in mind if you are using fill flash in open spaces, as on the water, there is a need to set the camera so that the background does not wash out from the brightness.
It is also useful to use a polarizing filter. It cuts down on glare, over exposer and gives the photographer the opportunity to add reflection to the composition. The polarizer will add brilliant darker color to the sky and the background. The polarizer also will cut through the glare of the water so that you can take a photo of the fish in various depths in the water. I had to do this in Costa Rica when I was sailfishing. The 150 lb (estimated ) Pacific Sailfish could not be lifted out of the water so I took my photograph with my circular polarizer and had the image of the fish under the water with its natural colors before the line was cut and the fish released.
Photographing between 11 am and 3 pm is probably the worst times of day to take pictures. The sky is too bright and images are blown out. Also the harsh rays of the sun dull the colors of the picture especially if you are shooting in that direction.
I love to photograph on the water at sunset. Great colors, contrasts are achieved at that time. People always shoot into the sun to get the great picture. What they find is a blown out circle of yellow or white. I shoot at an angle to the sun and try to get some type of image other than the sun as the focal point. Great silhouettes of people or objects that are focused in the foreground.
I will be most happy to funish samples.
Hank Arkin
Hank, thanks for taken the time . I have destroyed some great photo opportunities. Now I know why. Can’t what to apply your tips.
Hank, thanks for taken the time . I have destroyed some great photo opportunities. Now I know why. Can’t wait to apply your tips.